
tutorial nine
how to add a multi-select list field type to your form
The following lesson focuses the field type, the scrollable multi-select list. You will notice that it is similar to the “list of values” field type. The point of difference is that using the multi-select list field type will allow your users to be able to select more than one item from a list. This is an important functionality for your forms depending on what information you are collecting. Remember that there are photos included in this lesson to help you to follow along with the steps.
Go to http://console.formpa.com/formpa.html
In the “username” section, type in your email address and then type in your password. Click “login” once you have filled out these fields.
You are now logged in and ready to explore FormPA.
This lesson follows on from previous lessons, in particular tutorial 3 which explains how to use field types in your forms.
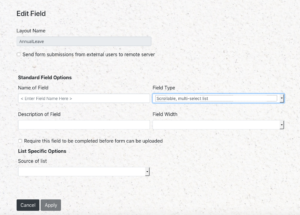
You will need to follow the same steps as other field types in order to make use of the “scrollable multi-select list” field type in your forms. The only difference is that under the “field type” heading after you’ve filled in the “Name of Field” section, you will select the “scrollable, multi-select list”. Please see the picture below.
If you want to ensure all of the forms that are submitted include this field, make sure you tick the box beside “require this field to be completed before form can be uploaded”. In the example for this lesson, as the annual leave form is being filled in by an employee and then approved by a manager, this field can be left unticked.
The multi-select list field is handy for sections on your form that require multiple options to be selected from a list. Continuing on the annual leave form theme from previous lessons, we have chosen to use this field type to allow multiple names to be selected from a list for the approval of leave.
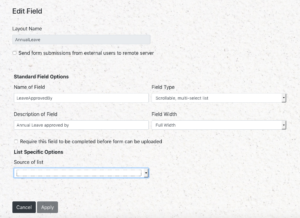
In the “Name of Field” section, type in your description without spaces between the words. For this lesson, we will call type in “LeaveApprovedBy” and then in the “Description of Field”, type in Annual Leave Approved by. Please note that it is up to you what you choose to put in these sections. Set the “field width” to Full Width.
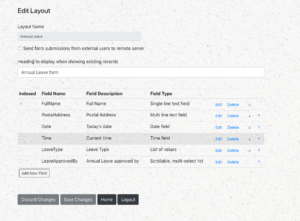
See the picture below. This is how your screen should look after the previous steps.
If at any point, you need to go back to the home screen, make sure you click on “save changes” button down the bottom or else you will lose your data. Then click on the “home” button to go back to the main screen.
As you do with the field, “the list of values”, you will also select “list of values” under the Source of List heading.
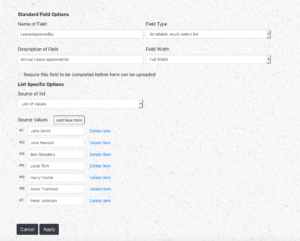
Next step is to click on “Add New Item”. This is where you will add in the options that your users can choose from for filling in this form. For this lesson, we have created several fictitious names in order to illustrate how this section of your form works. This annual leave form is being created for a workplace in which all annual leave has to be approved by the CEO and the person’s manager. The CEO is John Smith in every case.
Click “Add New Item” for each person’s name that you wish to add to your scrollable list. See the picture below.

Please see the example below, you will notice that we have set 7 options for names for the list. It is up to you how many you choose to include.
You will need to click “apply” to save these changes. After you do so, you will be taken back to the “Edit Layout screen”. Please click on “save changes”.
If you have done all of the previous lessons and used similar information, your screen will look similar to this picture below.
As previously mentioned, choosing the “Home” button will take you back to the main screen where you may choose to continue working or log out of FormPA. You will need to make sure that you have clicked on “save changes” before doing so.
Ready to continue learning more about fields, see below!
There are 13 fields that you can choose from in FormPA. Click on any of the fields below to see a lesson on how to add them to your form layout.
- Single line text field
- Multi line text field
- Date field
- Time field
- List of values
- A scrollable multi-select list
- Yes/No button
- Signature field
- Image upload
- Form
Are you ready to explore our other lessons? Click here to return to the list of tutorials