
tutorial three
how to add a single line text field to your forms
Lesson 3 is a continuation of lesson 2. You may need to repeat some of the steps from lesson 2 before continuing with this lesson.
If you have completed lesson 2, this is how your screen will look. Please see the picture below. You should see under “form layouts”, a new layout called “AnnualLeave”.
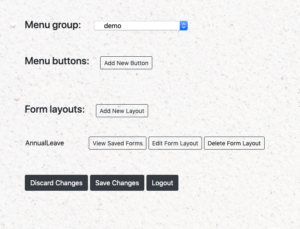
Click on “edit form layout” to the right of your newly created “AnnualLeave” layout.
How to use single line text fields for your data:
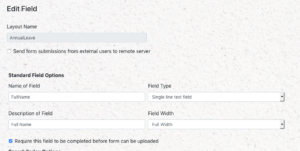
In this tutorial, we will continue on the annual leave form theme that was used in tutorial 2. There are several fields that are needed for an annual leave form. One of them is the person’s name and you will need to create a field on the form. Click on “add new field” then under the heading, “Name of Field”, you would type in “FullName” (without spaces). Under the field type, click on the appropriate field type. In this case, it would be a “single line text field”.
Next you will need to type in a description of this field. This is what is displayed to the user when they haven’t entered in any information for this field. For this purpose, we will type in “Full Name”. Next you will need to choose the field width, click on “Full width”.
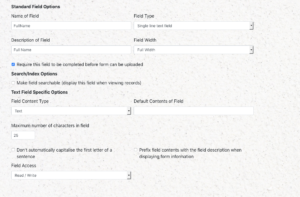
For information on your form that you would like all users to fill in before submitting a form, you will need to tick the “require this field to be completed” section. This means that the user will not be able to submit the form to the server if they have overlooked filling in a mandatory field.
You will notice that there is a section below this called “Search/Index Options”. This is a useful tool for finding information in forms that have been filled out by your users. Please leave this box unticked as how to use this section will be covered in tutorial 6.
Leave the field content type as “text’ and the default contents of field section can be left blank.
Next you will need to choose the amount of characters for the field. Choose an amount and type into the section, “maximum number of characters in field”. For a person’s name, 25 words max should suffice.
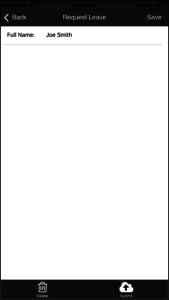
You will notice that there are two boxes underneath the “Maximum number of characters” section. The first one means that when your users fill in the information for a field that their wording will not be automatically capitalised by their devices ie. iPhone or iPad. The second box means that the field description will still be on display for the form’s user on the mobile version of FormPA even after they have filled out the information for that field. For example, it will show “Full Name” beside the information (please see the pic below).
It is up to you whether you choose to leave these two boxes unticked. For this tutorial, we will leave them unticked.
Under “field access”, you want your user to be able to fill in the form and not just read it so click on “read/write”. If you select, “read only”, the user will not be able to fill in the form and will only be able to read a form.
Click on “apply” to save this field.
After you have clicked “apply”, you will be taken back to the “Edit Layout” page (see the photo below). You will notice that you now have a new field created called “FullName”.
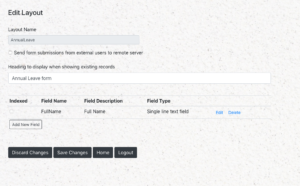
Click on the “save changes” button in order to save the field that you just created. If you want to go back to the main screen, click on the “Home” button to go back to the main page. At this point, you can log out of FormPA or choose to continue on to the next tutorial.
In this tutorial, you have learnt how to set up a single line text field. However, if you wish to gather information on your forms such as a person’s address then a multi line text field is particularly useful and you can learn how to use this field type by looking at tutorial four.
Ready to continue learning more about fields, see below!
There are 13 fields that you can choose from in FormPA. Click on any of the fields below to see a lesson on how to add them to your form layout.
- Single line text field
- Multi line text field
- Date field
- Time field
- List of values
- A scrollable multi-select list
- Yes/No button
- Signature field
- Image upload
- Form
Are you ready to explore our other lessons? Click here to return to the list of tutorials